


Cultured Butter Recipe
Fresh cultured butter is exquisite. Choose your favorite cream and culture it lightly or deeply, adding only as much salt as desired. The Proofer maintains the precise temperature for the cream culture to produce diacetyl, the delicious flavor component that intensifies buttery flavors.
Quality Ingredients. While butter can be made from any heavy cream, higher quality cream will produce more delicious butter. A pasteurized (rather than ultra-pasteurized) heavy cream is ideal. Whipping cream should be avoided if possible as it has additives that can slow the separation of the butter from the buttermilk.
The only other ingredient needed is a live dairy culture — this can be plain yogurt, cultured buttermilk, crème fraiche, sour cream or a purchased mesophilic starter such as Flora Danica. Although the cultures in buttermilk, crème fraiche and sour cream are the ones that are traditionally used to culture butter, yogurt also works surprisingly well and is widely available. Full fat, low fat, or nonfat yogurt will work in this recipe, as long as it has has live cultures.
Churning Methods. Once the cream is cultured there are several options for turning it into butter. The most low-tech method is to to shake the cultured cream in a jar. If you are using that method, the jar should be no more than half full and have a tight fitting lid to avoid leaks.
Churning can also be done in a food processor or stand mixer. If using a food processor, be sure to chill the cream first as the processor will heat the mixture considerably and you don’t want to risk melting the butter. If using a stand mixer, cover the mixer bowl with plastic wrap or a towel and lower the speed once the butter begins to separate to minimize splattering.
Printable Multi-language Recipes
Yield: Approximately 11 oz / 300 ml of butter plus about 1 pint / 500 ml of buttermilk. The recipe can easily be halved or doubled.
Timing: The cream can be cultured for as little as 12 hours or as long as 48 hours. An hour of chilling before churning is recommended. Churning, draining and washing take about 30 minutes.
Ingredients
| Table header 0 | U.S. | Metric |
|---|---|---|
| Heavy cream* | 1 qt / 32 oz | 1 L / 1 kg |
| Plain yogurt, buttermilk or sour cream** | 3 T / 1.5 oz | 3 T / 44 g |
| Salt (optional) | ⅛ tsp or to taste | 0.75 g or to taste |
*Preferably pasteurized rather than ultra-pasteurized; avoid whipping cream as it contains problematic additives.
**Must contain live cultures. Creme fraiche will work, too.
Equipment: Brød & Taylor Folding Proofer, culturing jar(s), butter muslin or fine strainer.
Note: When using the Folding Proofer to make butter, be certain there is no water in the water tray. The water tray is not needed for making yogurt. You can remove it from the Proofer, if you like, or leave it empty. But do not add water because it will affect temperature settings.
Get Ready. Allow the cream to warm to room temperature. Set up the Proofer with the thermostat at 72°F / 22 °C.
Culture the Cream. Mix the live culture yogurt (or buttermilk or sour cream) into the heavy cream. Put it in a covered jar or bowl and place in the Proofer to culture. Check the mixture after 12 hours – it should have a noticeable cultured or yogurt-y aroma and should look thicker than when you started. When ready, it can be churned or allowed to culture longer to develop more flavor. Tip: if you’ll be churning butter in jars (shaking), it’s convenient to culture the cream in jars that are half full.

40% cream cultured with buttermilk is thick enough to spoon
Chill the Cultured Cream (optional). For easier churning, the cream can be chilled in the refrigerator for an hour or so after culturing. Chilling is recommended if using a food processor to churn the butter, to avoid melting.
Churn the Butter. Once the cream is cultured, it will need agitation to separate into butter and buttermilk. It can be shaken in a jar (tightly lidded and half full at most), whipped with a mixer, or processed in the food processor. First the mixture will turn into whipped cream. After a few more minutes, you will notice solids starting to form (the cream will turn lumpy). Next, it will look a bit like a sponge separating from the liquid. Keep going until the solids have come together into a larger mass and separated completely from the buttermilk. If you are not sure if the butter is fully formed, go a little longer.
Drain the Buttermilk. Place either a very fine strainer or any strainer/colander lined with butter muslin over a bowl. Pour the butter mixture into the strainer and let the buttermilk drain. This is real buttermilk and can be used for baking or pancakes, or for Buttermilk Seed Bread, (and to start your next batch of butter). If you are using the butter muslin you can gather up the edges and squeeze to get out more buttermilk.
“Wash” the Butter. Remove as much of the remaining buttermilk as possible, so that the butter will not go rancid very quickly. Put the drained butter into a bowl and pour about a cup of cold water over it. Mash the butter against the bowl with the back of a spoon to work the water through. Drain and repeat until the water comes through completely clear (it usually takes 3-6 washes). The cold water washes will also have the effect of cooling and firming the butter – by the final wash you may need to use your hands to knead the butter.
Add Salt. Salt is optional. Adding salt will not only affect the saltiness of the butter but will also change the flavor. The more salt is added, the less noticeable the cultured flavor will be. Add salt to taste, mixing a small bit at a time through the butter, and taste as you go to avoid adding too much and losing the cultured flavor. If too much does end up in the butter, you can repeat the washing process to reduce it.
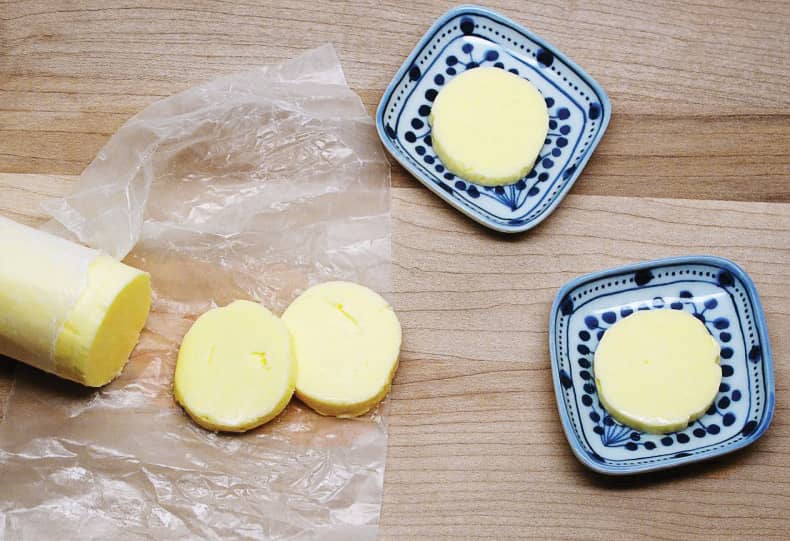
Storage. Wrap the butter in wax paper. If you plan to use it relatively quickly, wrap it well and store in the refrigerator, where it should keep for several weeks. Alternatively, it freezes well.

Butter and buttermilk, after churning

Frequently Asked Questions
What kind of cream do I need to make cultured butter?
While butter can be made from any heavy cream, higher quality cream will produce more delicious butter. A pasteurized (rather than ultra-pasteurized) heavy cream is ideal. Whipping cream should be avoided if possible as it has additives that can slow the separation of the butter from the buttermilk.
Can I use whipping cream instead of heavy cream?
Whipping cream should be avoided if possible as it has additives that can slow the separation of the butter from the buttermilk.
How can I make a soft spreadable cultured butter?
Prepare your homemade butter and rest at room temperature. Use a food processor to combine about 2/3 cup of grapeseed oil with 11 oz. of homemade butter. Add salt to taste and pulse until smooth. Transfer the soft butter into a container for storage. The soft butter spread will last about 2 weeks at room temperature and about 2 months in the refrigerator. If the oil separates while stored, return it to the processor and pulse until smooth or simply stir it until smooth.
How long can cultured butter be stored?
If it is well wrapped it should keep for several weeks and can be frozen for months.
Can cultured butter be used in all recipes instead of store bought?
Yes!
Why is it important to remove all buttermilk from cultured butter?
Removing as much of the buttermilk as possible prevents the butter from going rancid quickly.


